Home
| Yanmar
| Universal
| Westerbeke
| Volvo
| Boat Dollies
| Laser
| Sunfish
| Butterfly
| Harken Hoisters

Your Navigation Path


|
| Vang Purchase Plates | Boomkicker Frequently Asked Questions | Product Installation |
| Select the Right Boomkicker for Your Boat - List of Boomkickers | |
Below you will find the manufacturer's installation instructions for all models of the Boomkicker.
Model K0312
Recommended Installation Tools: Phillips Screwdriver,
Fine Tooth Hacksaw.
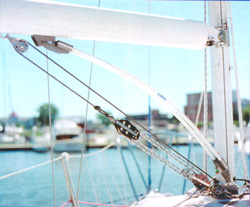
1. General: The Model K0312
Boomkicker is designed for sailboats under 17' (5m) who's boom, with sail,
weighs under 16 lbs. (6.8kg). To the right is a sketch of the Model K0312.
The Boomkicker comes fully assembled. Two fiberglass rods provide
the force to support the boom. The boom sits in the sling between the rods.
The sling is held by the line to the gooseneck stop and controls the initial
height of the boom. The mast fitting and stop use slides in the luff groove
to avoid drilling. As shown, the Boomkicker works by flexing upward and
when straight, it is at the top of its travel. The Boomkicker does not restrict
the boom from rising higher.

2. Installing Mast Bracket and Gooseneck Stop:
The Boomkicker works best if the boom/gooseneck is fixed in one spot on
the mast. If the boom/gooseneck can slide, then in the normal sailing position
with the sail up, place a mark on the mast, indicating the lowest point
of the gooseneck inside the luff groove. Then remove. Using the sail opening
in the mast, slide the assembled base with bracket and slide to the vang
bail, do not tighten. Next slide the top of the gooseneck stop to the mark
and tighten. Reposition the boom against the gooseneck stop. If the boom/gooseneck
is fixed to the mast, the slides can be detached, slid past the gooseneck
and reassembled in position.
3. Final Positioning: Using
the main halyard, lift the aft end of the boom 6"- 8" (15cm - 20cm) above
horizontal or the normal sailing level. Orient the Boomkicker so the two
screw heads on the base are facing downward or aft, and the sling loop for
the line is forward. If the Boomkicker fits in the area above the vang,
hold the sling around the underside of the boom and adjust the mast fitting
location to make an angle between 40° and 45° with the boom. The
sling line should be loose and is adjusted later. If the angle is much lower
than 40°, then as the spring rods flex, they lose ability to hold the
boom. Tighten the bracket in position. If the Boomkicker is too long
or the angle too low, it can be cut down. Shorten the bottom of the rods
(loosen two small screws in base to pull the rods out) equal lengths of
no more than 5" (13cm). A fine tooth hacksaw works best and frayed ends can
be avoided by prewrapping a layer of tape around the rod at the cut.
4. Final Adjustments: With the
boom/gooseneck held against the stop, adjust the line between the sling
and gooseneck stop so the sling supports the boom. Since some initial stretch
can be expected under load, slightly overtighten. Disconnect the halyard
from the boom and press the boom down to flex the Boomkicker. It should
flex freely upward and have enough support for the boom and mainsail without
sagging. If you have questions call 800/437-7654. Visit us at www.boomkicker.com.
Thanks again for choosing Boomkicker! Patents: 5070802,
6062155 Last Update: Jan. 2005
WARRANTY: The following is made in lieu of all warranties,
expressed or implied. Seller's and manufacturer only obligation shall be
to replace or repair such parts of the product proved to be defective for
a period of five years. User shall determine the suitability of the product
for its intended use and user assumes all risk and liability whatsoever
in connection therewith.
Model K0400
Recommended Installation Tools: Phillips Screwdriver,
Fine Tooth Hacksaw.
1. General: To the right is
a sketch of the Model K0400. The Boomkicker comes fully assembled.
Two fiberglass rods provide the force to support the boom. Two rod sets
of different diameter and force are included so you can choose the set that
best matches your boom and preference for support. The larger set is initially
installed. The boom sits in the sling between the rods. The sling is held
by a line to the gooseneck stop installed directly under the boom gooseneck
and controls the initial height of the boom. The mast fitting and
stop use slides in the luff groove to avoid drilling. As shown, the Boomkicker
works by flexing upward and when straight, it is at the top of its travel.
Note that the Boomkicker does not restrict the boom from rising higher .

2. Installing Mast Bracket and Gooseneck Stop:
The Boomkicker works best if the boom gooseneck is fixed in one spot on
the mast. If the boom gooseneck can slide, then in the normal sailing position
with the sail up, place a mark on the mast, indicating the lowest point
of the gooseneck(Including any portion inside the luff groove). Then remove.
Using the sail opening in the mast, first slide the mast fitting down to
the vang bail, do not tighten. Next slide the top of the gooseneck stop to
the mark and tighten. Reinsert the boom so against the gooseneck stop. If
the boom gooseneck is fixed to the mast, the slides can be detached, slid
past the gooseneck and reassembled.
3. Final Positioning: Using
the main halyard, lift the aft end of the boom 6"- 8" (15cm - 20cm) above
horizontal or normal sailing level . If the Boomkicker fits in the area
above the vang, hold the sling around the under side of the boom and adjust
the mast fitting location to make an angel between 40° and 45° with
the boom. The sling line should be loose and is adjusted later. If the angle
is much lower than 40°, then as the spring rods flex, they lose ability
to hold the boom. Tighten the bracket in position and reattach the Boomkicker
with flat heads of screws on top and the sling loop for the line, forward.
If the Boomkicker is too long to fit in the area above the vang, or the angle
is low, the spring rods can be cut down. Shorten the bottom of both rods
(Use the provided hex-key to loosen rod clamp.) equal lengths of no more
than 8" (20cm). A fine tooth hacksaw works best. Before tightening the rod
clamp, make sure the rods are against the stops on the lower plate and Boomkicker
labels are out.
4. Final Adjustments: Adjust
the line between the sling and the gooseneck stop so the sling supports the
boom. Since some initial stretch can be expected under load, slightly overtighten.
Disconnect the halyard from the boom and press the boom down to flex the
Boomkicker and test the force. Rods should flex freely upward and support
the boom and mainsail without the boom sagging. Too much force will cause
the boom to bow upwards. If so, replace the rods with the smaller 3/8" (9.5
mm) dia. set. If you have questions, call 800-437-7654, or email us at info@boomkicker.com.
Visit us at www.boomkicker.com.
Thanks again for choosing Boomkicker! Patents: 5070802, 6062155
Last Update: January 2005
WARRANTY: The following is made in lieu of all warranties,
expressed or implied. Seller's and manufacturer only obligation shall be
to replace or repair such parts of the product proved to be defective for
a period of five years. User shall determine the suitability of the product
for its intended use and user assumes all risk and liability whatsoever
in connection therewith.
Model K0750
Recommended Installation Tools: Phillips Screwdriver;
Fine Tooth Hacksaw; Center Punch; Rule; Variable Speed Reversible Drill and
Blue Locktite.
1. Setup Boom Height: Sliding goosenecks should be
positioned for sailing. Securing a stop under the gooseneck relocates the
position for rigging. Use the main halyard to support the boom above its
highest operating position (typically with the outboard end 6" (15cm) to
12" (30cm) above the horizontal.). Note: If the boom lifts approx.
10" (25cm) beyond this height, the Boomkicker releases from the boom fitting
(safety feature). To prevent accidental release, restrict vang travel by
either cleating the vang, restricting travel with a knot or adjusting the
length of a cascade. At this time, check that the Model K0750 is
correct. The min. length is 26" (66cm) pin to pin and the max. weight it
can support is approx. 21 lbs. (10kg) measured at the outboard end of the
boom with the main sail flaked.
2. Position Boomkicker: The Boomkicker works by flexing
upward and when straight, it is at the top of its travel. Install the Boomkicker
with the screw head side of rod clamps facing up. With the boom height set,
position the Boomkicker with fittings alongside the vang triangle to see
how it fits. Position is not critical so long as it does not interfere with
the vang (it is recommended that both the vang and the Boomkicker make an
angle of between 30o and 45o with the boom). Mark the
location for the mast fitting.
3. Install Mast Fitting: The mast fitting comes with
a luff grove slide to avoid drilling the mast. Different diameters and flat
slides are available. If usable, the slide can often be inserted at the
mast opening for the sail and lowered with a string. Reassemble the mast
fitting at the desired location and tighten the screws. If the slide is
unusable, the mast fitting may be screwed directly to the mast. Use the
#25 drill and the 10-24 tap provided, with the mast fitting bracket as a
guide. A variable speed, reversible drill makes tapping easy. Use Locktite
on threads.
4. Shorten if Necessary: If the Boomkicker is too long,
loosen the rod clamps on the mast end extension with the provided hex-key
and slide the extension up the rods until there is a good fit. The bottom
half of the clamp fittings for each extension have embossed stops to prevent
slipping. If the rod length protruding beyond the rod clamps is more than
5" (13cm), replace the present rods with the smaller rods. Do not shorten
total length more than 10" (25cm). Cut off extra rod length equally from
both rods with a fine tooth hacksaw. Before tightening the clamps, check
the rod ends are against the embossed stops and the boom extension is not
twisted relative to the mast extension.
5. Install Boom Fitting: Make sure the rod clamps at
both ends are tight. With the Boomkicker in position and slid to the back
of the boom fitting, mark its location. Using the boom fitting as a template,
center punch (to prevent wandering), then drill and tap one hole. Tapping
with a variable speed, reversible drill makes it easy. Attach the boom fitting
as a guide to center punch, drill and tap the remaining holes. Use Locktite
on threads. After installation, check return force by pushing down on the
end of the boom. Excessive return force will make the boom bow upward. For
reference, with the sail flaked, only about 10 lbs. (4.5kg) should be needed
to pull the end of the boom down. If the force is excessive, use the lighter
rods. If already in use, additional rods are available. Question? Call 800/437-7654.
Visit us at www.boomkicker.com. Thanks again for choosing Boomkicker! Patents:
5070802, 6062155. Last update: January 2005
WARRANTY: The following is made in lieu of all warranties,
expressed or implied. Seller's and manufacturer only obligation shall be
to replace or repair such parts of the product proved to be defective for
a period of five years. User shall determine the suitability of the
product for its intended use and user assumes all risk and liability whatsoever
in connection therewith.
Model K1000
Important: To avoid undue stress on the boom fitting,
booms should to be fixed in the upright position. If the boom can roll
about its' central axis, please contact the factory before installation.
Recommended Installation Tools: Phillips Screwdriver;
Fine Tooth Hacksaw; Center Punch; Rule; Variable Speed Reversible Drill
and Blue Locktite.
1. Setup Boom Height: Use
the main halyard to support the boom above its highest operating position
(typically with the outboard end 6" (15cm) to 12" (30cm) above the horizontal.)
Note: If the boom accidentally lifts approx. 10" (25cm) beyond this
height, the Boomkicker releases from the boom fitting (safety feature).
To prevent accidental release, restrict vang travel by either cleating the
vang, restricting travel with a knot or adjusting the length of a cascade.
At this time, check that the Model K1000 is correct. The min. length is 35"
(89cm) pin to pin and the max. weight it can support is approx. 34 lbs. (15kg)
measured at the aft end of the boom with the main sail flaked.
2. Position Boomkicker: The
Boomkicker works by flexing upward and when straight, it is at the top
of its travel. Install the Boomkicker with the screw head side of rod clamps
facing up. With the boom height set, position the Boomkicker with fittings
alongside the vang triangle to see how it fits. Position is not critical
so long as it does not interfere with the vang (it is recommended that both
the vang and the Boomkicker make an angle of between 30o and 45o with
the boom). Mark the location for the mast fitting.
3. Install Mast Fitting: The
mast fitting comes with a luff grove slide to avoid drilling the mast. Different
diameters and flat slides are available. If usable, the slide can often
be inserted at the mast opening for the sail and lowered with a string.
Reassemble the mast fitting at the desired location and tighten the screws.
If the slide is unusable, the mast fitting may be screwed directly to the
mast. Use the #7 drill and the 1/4-20 tap provided, with the mast fitting
bracket as a guide. A variable speed, reversible drill makes tapping easy.
Use Locktite on threads.
4. Shorten if Necessary: If
the Boomkicker is too long, loosen the rod clamps on the mast end extension
with the provided hex-key and slide the extension up the rods until there
is a good fit. The bottom half of the clamp fittings for each extension
have embossed stops to prevent slipping. If the rod length protruding beyond
the rod clamps is more than 5" (13cm), replace the present rods with the
smaller rods. Do not shorten total length more than 10" (25cm). Cut off
extra length equally from both rods with a fine tooth hacksaw. Before tightening
the clamps, check the rod ends are against the embossed stops and the boom
extension is not twisted relative to the mast extension.
5. Install Boom Fitting: Make
sure the rod clamps at both ends are tight. With the Boomkicker in position
and slid to the back of the boom fitting, mark its location. Using the boom
fitting as a template, center punch (to prevent wandering), then drill and
tap one hole. Tapping with a variable speed, reversible drill makes it easy.
Attach the boom fitting as a guide to center punch, drill and tap the remaining
holes. Use Locktite on threads. After installation, check return force
by pushing down on the end of the boom. Excessive return force will make
the boom bow upward. For reference, with the sail flaked, only about 10
lbs. (4.5kg) should be needed to pull the end of the boom down. If the force
is excessive, use the lighter rods. If already in use, additional rods are
available. Question? Call 800/437-7654. Visit us at www.boomkicker.com.
Thanks again for choosing Boomkicker! Patents: 5070802, 6062155.
Last update: January 2005
WARRANTY: The following is made in lieu of all
warranties, expressed or implied. Seller's and manufacturer only obligation
shall be to replace or repair such parts of the product proved to be defective
for a period of five years. User shall determine the suitability of the
product for its intended use and user assumes all risk and liability whatsoever
in connection therewith.
Model K1500
Important: To avoid undue stress on the boom fitting,
booms should to be fixed in the upright position. If the boom can roll
about its' central axis, please contact the factory before installation.
Recommended Installation Tools: Phillips Screwdriver;
Fine Tooth Hacksaw; Center Punch; Rule; Variable Speed Reversible Drill
and Blue Locktite.
1. Setup Boom Height: Use
the main halyard to support the boom above its highest operating position
(typically with the outboard end 6" (15cm) to 12" (30cm) above the horizontal.)
Note: If the boom accidentally lifts approx. 10" (25cm) beyond this
height, the Boomkicker releases from the boom fitting (safety feature).
To prevent accidental release, restrict vang travel by either cleating the
vang, restricting travel with a knot or adjusting the length of a cascade.
At this time, check that the Model K1000 is correct. The min. length is 35"
(89cm) pin to pin and the max. weight it can support is approx. 34 lbs. (15kg)
measured at the aft end of the boom with the main sail flaked.
2. Position Boomkicker: The
Boomkicker works by flexing upward and when straight, it is at the top
of its travel. Install the Boomkicker with the screw head side of rod clamps
facing up. With the boom height set, position the Boomkicker with fittings
alongside the vang triangle to see how it fits. Position is not critical
so long as it does not interfere with the vang (it is recommended that both
the vang and the Boomkicker make an angle of between 30o and 45o with
the boom). Mark the location for the mast fitting.
3. Install Mast Fitting: The
mast fitting comes with a luff grove slide to avoid drilling the mast. Different
diameters and flat slides are available. If usable, the slide can often
be inserted at the mast opening for the sail and lowered with a string.
Reassemble the mast fitting at the desired location and tighten the screws.
If the slide is unusable, the mast fitting may be screwed directly to the
mast. Use the #7 drill and the 1/4-20 tap provided, with the mast fitting
bracket as a guide. A variable speed, reversible drill makes tapping easy.
Use Locktite on threads.
4. Shorten if Necessary: If
the Boomkicker is too long, loosen the rod clamps on the mast end extension
with the provided hex-key and slide the extension up the rods until there
is a good fit. The bottom half of the clamp fittings for each extension
have embossed stops to prevent slipping. If the rod length protruding beyond
the rod clamps is more than 5" (13cm), replace the present rods with the
smaller rods. Do not shorten total length more than 10" (25cm). Cut off
extra length equally from both rods with a fine tooth hacksaw. Before tightening
the clamps, check the rod ends are against the embossed stops and the boom
extension is not twisted relative to the mast extension.
5. Install Boom Fitting: Make
sure the rod clamps at both ends are tight. With the Boomkicker in position
and slid to the back of the boom fitting, mark its location. Using the boom
fitting as a template, center punch (to prevent wandering), then drill and
tap one hole. Tapping with a variable speed, reversible drill makes it easy.
Attach the boom fitting as a guide to center punch, drill and tap the remaining
holes. Use Locktite on threads. After installation, check return force
by pushing down on the end of the boom. Excessive return force will make
the boom bow upward. For reference, with the sail flaked, only about 10
lbs. (4.5kg) should be needed to pull the end of the boom down. If the force
is excessive, use the lighter rods. If already in use, additional rods are
available. Question? Call 800/437-7654. Visit us at www.boomkicker.com.
Thanks again for choosing Boomkicker! Patents: 5070802, 6062155.
Last update: January 2005
WARRANTY: The following is made in lieu of all
warranties, expressed or implied. Seller's and manufacturer only obligation
shall be to replace or repair such parts of the product proved to be defective
for a period of five years. User shall determine the suitability of the
product for its intended use and user assumes all risk and liability whatsoever
in connection therewith.
|
| Vang Purchase Plates | Boomkicker Frequently Asked Questions | Product Installation |
| Select the Right Boomkicker for Your Boat - List of Boomkickers | |